
Garment Photography Editing: The Complete Professional Post-Production Workflow for Ecommerce Apparel
A studio-authored, 10-step retouching blueprint from Uniqs Studio — built on 500,000+ apparel images edited for Indian D2C brands and marketplace sellers.
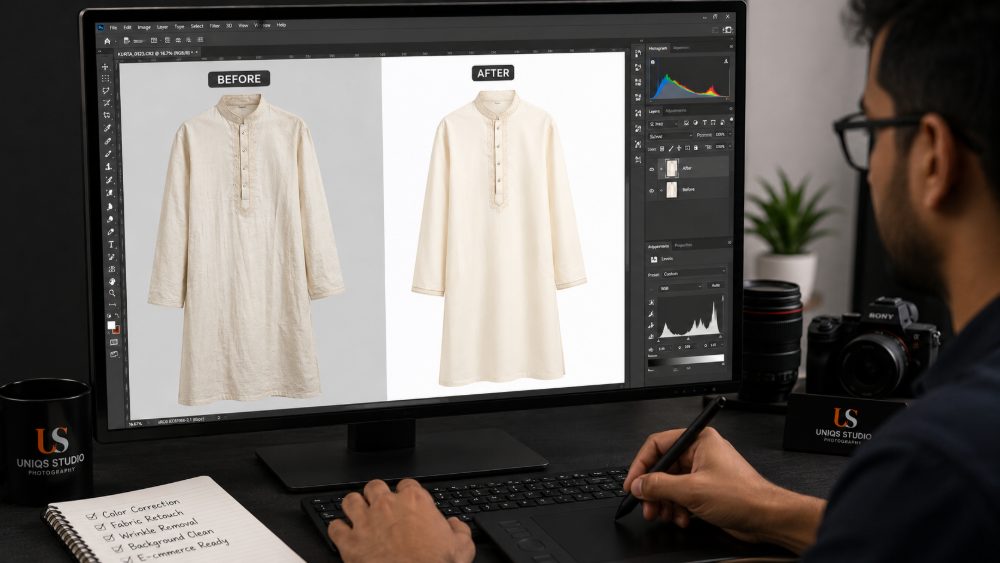
Before and after: raw studio capture versus a marketplace-ready garment image after the full Uniqs Studio editing workflow.
If your ecommerce return rate feels stubbornly high, the culprit is rarely the outfit itself — it is the garment photography editing behind it. Poorly retouched apparel photos wash out fabric tones, distort colours, and quietly kill conversions. In this pillar guide, Satyam and the Uniqs Studio team walk you through the same 10-step post-production workflow used on our production floor every day — the same discipline that turns raw studio captures into marketplace-approved, conversion-ready catalogue images for Amazon India, Myntra and Flipkart apparel brands.
Key Takeaways
- A repeatable 10-step workflow removes guesswork from bulk apparel retouching.
- Colour accuracy to Delta E < 2 is the single biggest driver of lower return rates.
- Marketplace-specific export presets prevent silent rejections on Myntra, Amazon and Flipkart.
- Ghost mannequin compositing outperforms flat lay for structured clothing SKUs.
- Outsourcing bulk editing beats in-house economics past 300 SKUs per month.
Table of Contents
What Is Garment Photography Editing?
Garment photography editing is the professional post-production discipline of preparing apparel photographs for ecommerce — encompassing colour correction, background cleanup, wrinkle removal, dust and lint retouching, ghost mannequin compositing, and marketplace-ready export formatting. It sits between the raw studio capture and the final catalogue listing, and it is the single stage that decides whether a shopper trusts what they see on screen. At Uniqs Studio, we treat clothing photo editing as a manufacturing-grade process, not a creative afterthought.
The scope goes well beyond a Lightroom preset. A proper apparel retouching pass rebuilds fabric tone, corrects lighting drift, cleans stray threads, and reconstructs the hollow interior of a ghost mannequin shot — all while preserving the natural drape of the outfit. If you are new to studio production, our garment photography services page shows the capture side, and this guide covers the post-production half of the same pipeline. For fashion labels planning a full catalogue, our fashion catalogue photography guide shows how shoot and edit stages connect.
Why Garment Photography Editing Matters for Ecommerce Conversions
According to Baymard Institute research, product image quality is consistently cited as the top on-page factor influencing purchase decisions in fashion ecommerce. Roughly one in four apparel returns in India cite “item looks different from photo” as the primary reason — a direct financial cost that traces back to weak colour correction and inconsistent retouching. Strong garment photography editing does not just make clothes look good; it protects margin.
Marketplace algorithms also reward clean, compliant imagery. Higher CTR on the listing thumbnail feeds a virtuous loop of ranking and sales velocity — which is why we treat apparel image retouching as a growth lever, not a chore. Brands that have invested in proper editing consistently see the pattern documented in our post on how fashion photography increases clothing sales, and the effect compounds when the visual language is consistent across every SKU.
How Poor Editing Increases Return Rates
When a maroon kurta ships looking coral because of a warm colour cast, the customer returns it — no matter how good the physical product is. Return logistics, restocking, and lost trust eat 15-25% of margin on apparel in India. Uniqs Studio has seen client return rates drop by 28-34% after switching from freelance retouching to a disciplined studio workflow, simply because Delta E colour accuracy is enforced on every image.
The Role of Editing in Marketplace Approvals
Marketplaces reject clothing images silently or push them down the ranking when the background is not pure #FFFFFF, when the file is under-resolution, or when embedded colour profiles are missing. The Amazon Seller Central image guidelines and Myntra Partner Portal are non-negotiable — one failed check can pull a whole SKU off search. A tight ecommerce image editing pass builds in those checks up front so nothing gets rejected downstream.
The Complete Garment Photography Editing Workflow (10 Steps)
This is the exact workflow Uniqs Studio runs on 10,000+ apparel images every month for D2C brands, marketplace sellers and export houses. Every step is documented, versioned, and QC-checked so a 500-SKU catalogue leaves the studio with the same colour discipline as a 50-SKU capsule. Whether you are editing in-house or briefing a vendor, this is the checklist to build around.
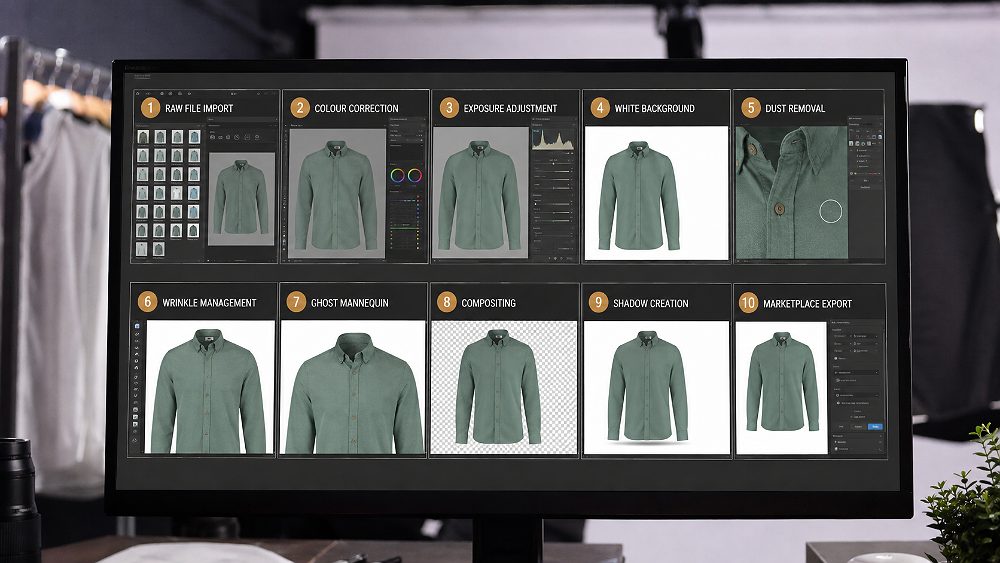
The 10-step apparel post-production pipeline used by Uniqs Studio for bulk ecommerce catalogues.
Step 1 — File Import & RAW Processing
Every serious apparel post-production pass starts with the RAW file, never a JPEG. RAW preserves the full colour depth from the camera sensor, which gives retouchers the latitude to recover blown highlights on white cotton or lift shadow detail on black attire without introducing banding. Import into Adobe Lightroom or Capture One with a strict folder structure — SKU code, colourway, shot type — so downstream batches never get mixed up.
Recommended File Format & Colour Profile Setup
Set your working colour space to sRGB for anything destined for ecommerce; reserve Adobe RGB only for print collateral. Embed the profile on export so the browser and mobile app render the exact tone you approved on your calibrated monitor. This one setting eliminates the classic “colour looked fine on my Mac but wrong on the phone” problem.
Step 2 — Colour Correction for Clothing
Colour correction is the most technically demanding stage of garment photography editing, and the one most freelancers get wrong. Drop the white balance picker on the neutral grey patch of an X-Rite ColorChecker Passport captured in the first frame of every set. Then fine-tune Kelvin temperature and tint against the physical fabric swatch under D50 daylight. The target industry tolerance for apparel is Delta E < 2 — anything above and the customer’s eye catches the mismatch.
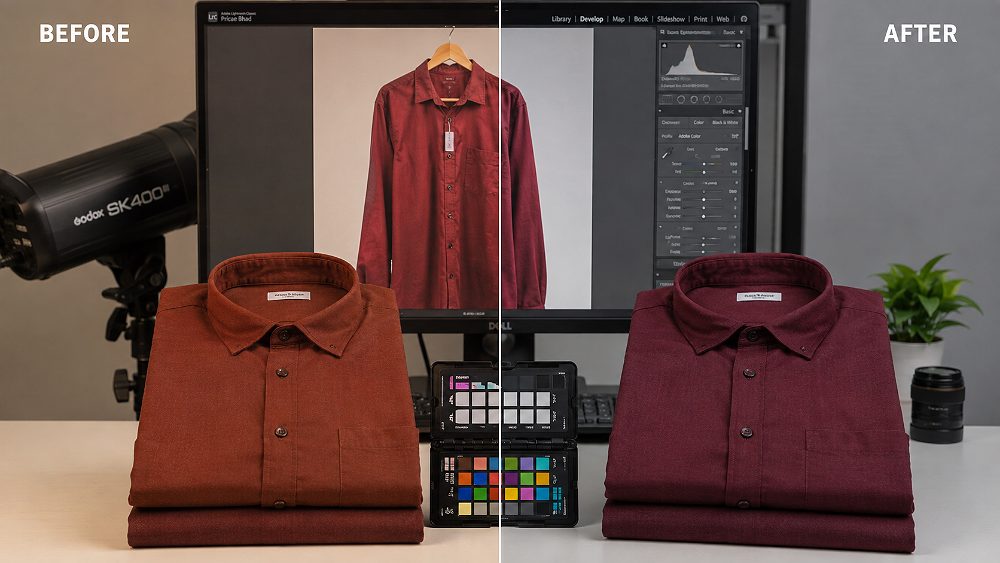
Left: uncorrected warm colour cast. Right: after ColorChecker-based white balance and Delta E < 2 correction.
Matching Fabric Colour to the Real Product
Silk, chiffon and rayon each reflect studio strobes differently. Uniqs Studio maintains a physical fabric library so retouchers can hold the swatch beside the calibrated screen during the correction pass — the same discipline our team applies during fashion photography capture ensures editing has the right reference in the first place.
Using ColorChecker Passport for Accuracy
Build a custom camera profile for each lighting setup using X-Rite’s calibration tool. This one-time setup pays for itself within the first hundred images because it removes iterative colour tweaks from the workflow entirely — a huge time saver on bulk clothes retouching.
Step 3 — Exposure & Contrast Adjustment
Read the histogram before touching any slider. Recover blown highlights on white apparel by pulling the highlight slider left, and lift crushed shadow detail on dark outfits without introducing noise. A gentle S-curve on the contrast adjustment adds punch to fabric weave, but overdoing it flattens fabric texture and makes cotton look like polyester. This is where subtle work separates studio-grade retouching from amateur editing.
Step 4 — Background Cleanup & White Background Creation
Marketplace-grade backgrounds are pure #FFFFFF, not “almost white.” Use the Curves adjustment to push background pixels above 250,250,250 while masking the garment edges so hair-fine details (fringes, lace, netting) survive intact. Select Subject in Photoshop 2025 followed by Refine Edge handles most modern apparel cleanly, and the pen tool takes over for structured pieces like blazers and jackets. Our ghost mannequin photography service uses this exact prep as the base layer.
Pure White #FFFFFF vs Off-White Standards
Amazon India, Flipkart and Myntra all specify pure white (RGB 255,255,255) for the primary catalogue image. Off-white or cream backgrounds get downranked and sometimes rejected. Save this as a Photoshop Action so every retoucher on the team applies it identically.
Step 5 — Dust, Lint & Thread Removal
Dust particles, lint balls and stray sewing threads are invisible in the studio and glaring in a 2000px web image. Zoom to 100% and work systematically corner to corner with the Spot Healing Brush for isolated specks and the Clone Stamp for repeating fabric patterns. For high-detail zones — buttonholes, embroidery, sequins — the Frequency Separation technique preserves fabric weave while removing surface debris. This is slow, patient work, and it is what separates a rushed edit from a professional garment photo retouching pass.
Step 6 — Wrinkle & Crease Management
Not all wrinkles are enemies. Natural drape wrinkles at the hem, sleeve break and neckline give an outfit dimension and “lived-in” credibility — remove them all and the clothing looks plastic. The rule at Uniqs Studio: kill distracting horizontal creases across the chest and lap, keep the structural folds that show fabric weight. The Healing Brush handles most of it; the Liquify tool reshapes shoulder lines when the mannequin fit was imperfect. This nuanced clothing photo editing decision is where senior retouchers earn their keep.
Step 7 — Ghost Mannequin Compositing
The invisible-mannequin effect is the highest-converting catalogue format for structured apparel. Composite the interior neck shot behind the main garment layer, align the shoulder seams pixel-perfect, and mask out the mannequin so only the fabric remains. Colour-match the interior neckband to the exterior fabric so the illusion holds under scrutiny. Brands scaling their ghost mannequin catalogues can review current benchmarks in our 2026 ghost mannequin pricing guide, and the format comparison in ghost mannequin vs model vs flat lay shows when each style wins.
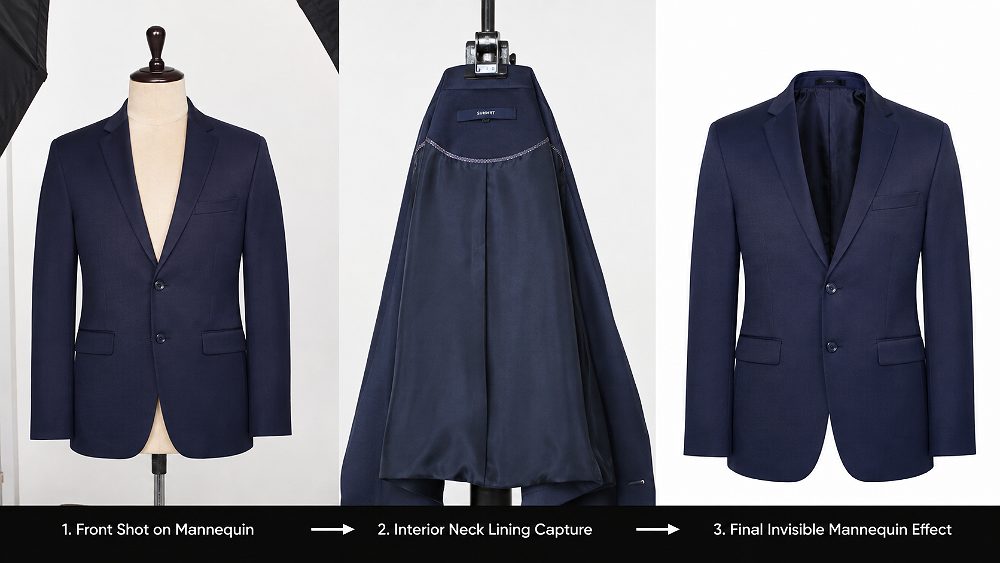
Ghost mannequin compositing: front capture, interior neck shot, and the final invisible-mannequin result.
Step 8 — Shadow Creation & Depth
A garment floating on pure white looks cut-out. Add a soft natural drop shadow at 30-45% opacity with a 15-25px Gaussian blur, angled to match the studio key light direction. Ground shadows under shoes, bags and heavy outerwear add weight; floating shadows under lightweight tops maintain airiness. Marketplace rules allow soft natural shadow — hard black drop shadows or coloured shadows are flagged.
Step 9 — Sharpening & Fabric Texture Enhancement
Sharpening at the end, not the beginning. Duplicate the flattened layer, apply Smart Sharpen at Amount 80-120, Radius 1.2-1.8, and mask the effect so only fabric edges and weave get the boost — never skin tones or metal hardware. High Pass Filter at 2-3px on a Soft Light blend layer is the pro alternative and gives more control on delicate materials like chiffon and organza. Overdo either and you get halos, jagged edges, and the tell-tale “HDR clothing” look that screams amateur editing.
Step 10 — Export & Marketplace-Ready Formatting
Export presets are non-negotiable. Save one preset per marketplace with the correct dimensions, colour profile, quality setting and file naming convention baked in. This step turns a 45-minute per-image edit into a two-second automated export — and it is where studios save the most time on bulk apparel retouching contracts.
Amazon India Image Specifications
Minimum 1000px on the longest side (1600-2000px recommended for zoom), pure white background, JPEG format, sRGB embedded, garment filling 85% of the frame, and file under 10 MB. Follow the Amazon India image standards to the letter.
Myntra & Ajio Image Requirements
Myntra prefers 1080x1440px portrait ratio for apparel, Ajio uses 1200x1600px, both demand pure white and clean shadow. Ghost mannequin is the preferred catalogue format on both platforms for structured clothing SKUs.
Flipkart, Nykaa & Meesho Export Presets
Flipkart requires 500x500px minimum (2000x2000px recommended), Nykaa Fashion accepts 1080x1440px, and Meesho works well at 1200x1200px square. Build all three as Lightroom or Photoshop export presets and switch based on the client brief — a small operational shift that saves hours on multi-marketplace catalogues.
Best Software for Garment Photography Editing
Tool choice depends less on the software itself and more on how each fits into the workflow. Most professional studios — Uniqs Studio included — run a combination stack rather than picking a single winner. Understanding where each tool earns its cost is the fastest path to a lean, scalable pipeline for clothing photo retouching.
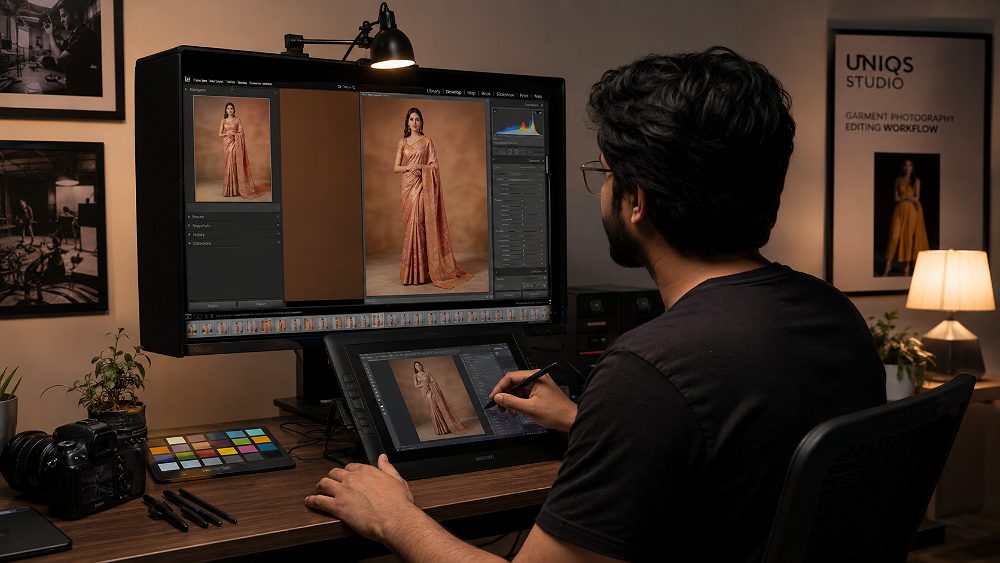
A retoucher’s workstation at Uniqs Studio: colour-calibrated monitor, Adobe Photoshop, and pen tablet for pixel-level apparel edits.
Adobe Photoshop for Detailed Retouching
Photoshop is the undisputed leader for pixel-level apparel retouching — ghost mannequin compositing, wrinkle liquify, dust cleanup and shadow work all live here. The layer stack, non-destructive smart objects, and Actions engine make it the only realistic choice for premium garment photo editing. See official documentation at Adobe Photoshop Help for feature depth.
Adobe Lightroom for Bulk Colour Correction
Lightroom is unmatched for bulk RAW processing, colour correction across a full shoot, and syncing settings across hundreds of images. It handles Steps 1-3 of the workflow — import, colour, exposure — before handoff to Photoshop for detailed apparel image retouching. Lightroom Classic remains preferred over Lightroom CC for studio catalogues because of its catalogue management.
Capture One for Tethered Studio Workflows
Capture One Pro is our tethering choice on the shoot floor for high-volume ecommerce shoots. Its colour engine, live tethered view and session-based file organisation are purpose-built for studio production — meaning fewer surprises when files hit the editing pipeline. Many fashion studios pair Capture One for capture with Photoshop for finishing.
Common Garment Photography Editing Mistakes to Avoid
In our nine years running Uniqs Studio, the same eight editing mistakes surface again and again — and each one silently damages sales. Watch for these on your existing catalogue before commissioning a new shoot.
- Over-smoothing fabric texture until cotton looks like polyester — kills authenticity and increases returns on premium fabric SKUs.
- Wrong shade of white in the background (245,245,245 instead of 255,255,255) — triggers silent marketplace downranking.
- Colour cast bleed from a warm studio strobe left uncorrected — the classic “maroon looks coral” return trigger.
- Over-sharpening halos around collars and hemlines that scream amateur editing at a glance.
- Removing every wrinkle, killing natural drape and making the outfit look plastic and computer-generated.
- Re-saving JPEGs multiple times through the workflow, compounding compression artefacts.
- Skipping the ColorChecker reference frame — forcing retouchers to guess colour instead of measure it.
- Ignoring marketplace-specific export settings and using one generic preset for every channel.
If any of these look familiar in your current catalogue, an audit-and-rework pass typically recovers 15-25% in listing performance within 60 days. Book Satyam for a free 15-minute audit on WhatsApp at +91-8076745824 to see where your current retouching is leaking conversions.
In-House vs Outsourced Garment Photo Retouching
The economics flip somewhere around 300 SKUs per month. Below that, an in-house retoucher and a Photoshop subscription can work. Above that, dedicated studio capacity — colour-calibrated hardware, tiered QC, redundant backup systems, and cover for leave and illness — becomes measurably cheaper per image than salaried in-house talent. The hidden cost most brands miss is turnaround risk: an in-house team of one is one flu away from a delayed festive launch.
| Factor | In-House | Outsourced (Uniqs Studio) |
|---|---|---|
| Cost per image | ₹120-200 | ₹25-150 |
| Speed at scale | Limited by headcount | Elastic team capacity |
| QC layer | Self-review | Dedicated QC pass |
| Setup time | 4-8 weeks | 48 hours |
| Software & hardware cost | ₹3-5 lakh upfront | Included |
| Leave / illness cover | None | Full team backup |
Garment Photography Editing Pricing in India (2026)
Uniqs Studio publishes transparent per-image pricing so brands can budget accurately. Rates below reflect Delhi NCR production costs in 2026 and include colour correction, retouching, and marketplace-ready export. Bulk volumes past 500 images unlock further tiered discounts on a project-quote basis.
Basic
- Basic colour correction
- Pure #FFFFFF background
- Simple dust cleanup
- JPEG export
- 48-hour turnaround
- Min. 100 images
Standard
- Advanced colour correction
- White / transparent background
- Dust, lint, thread removal
- Basic wrinkle management
- Natural shadow creation
- Marketplace export presets
- 24-hour turnaround
- Min. 50 images
Premium
- Full retouching workflow
- Ghost mannequin compositing
- Advanced wrinkle removal
- Fabric texture enhancement
- Multi-marketplace exports
- Colour swatch matching
- 12-hour turnaround
- Min. 25 images
Enterprise
- Dedicated retouching pod
- Bulk processing (1000+ images)
- Brand style guide compliance
- Priority 6-hour turnaround
- QC layer + revisions
- Cloud delivery system
- Monthly retainer option
Why Choose Uniqs Studio for Garment Photography Editing
Uniqs Studio is a Delhi NCR-based apparel photography and post-production studio with 9+ years of ecommerce production experience under Satyam’s leadership. Our retouching team has processed catalogues for D2C fashion labels, marketplace sellers, and export houses across every major Indian ecommerce channel — Amazon, Myntra, Flipkart, Ajio, Nykaa Fashion and Meesho. Every project runs through a documented QC pass, so what you approve is what your customer sees on-screen. See sample work on our garment photography portfolio and read production benchmarks in our ecommerce garment photography guide.
To brief a project or request three free sample edits on your own SKUs, WhatsApp Satyam at +91-8076745824, call +91-8076745824, or email [email protected]. Sample edits typically return in 24 hours with a per-image quote for the full catalogue. If your brand is also planning a fresh shoot, our team can quote capture and post-production together — see rate benchmarks in our Delhi fashion photography cost guide.
Ready to Elevate Your Apparel Catalogue?
Get three free sample edits on your own SKUs. No commitment, 24-hour turnaround.
Frequently Asked Questions About Garment Photography Editing
Short answers to the most common questions apparel brands ask before commissioning a retouching project with Uniqs Studio.
What is garment photography editing?
Garment photography editing is the professional post-production process of enhancing apparel photographs for ecommerce — including colour correction, background cleanup, wrinkle removal, dust cleanup, ghost mannequin compositing, and marketplace-ready export formatting.
How much does garment photo editing cost in India?
Garment photography editing in India typically costs between ₹25 to ₹250 per image depending on complexity. Basic edits start at ₹25-40, standard retouching ranges ₹60-100, and premium ghost mannequin work costs ₹150-250 per image at Uniqs Studio.
Which software is best for clothing photo editing?
Adobe Photoshop is best for detailed retouching, Adobe Lightroom excels at bulk colour correction, and Capture One is ideal for tethered studio workflows. Most professional studios run a combination — Lightroom for RAW processing, Photoshop for advanced apparel retouching.
How do you edit clothing photos for Myntra and Amazon India?
Edit clothing photos with pure white #FFFFFF background, 2000px minimum resolution, sRGB colour profile embedded, JPEG format at 80-100 quality, and file size under 10 MB. Ghost mannequin or flat lay presentation is preferred over on-model for catalogue positions.
How long does professional garment photography editing take?
Professional garment photography editing takes 15-45 minutes per image for advanced retouching, and 3-8 minutes for basic edits. Bulk turnaround for 100+ images ranges 24-72 hours depending on complexity and studio capacity.
Conclusion & Next Steps
A disciplined garment photography editing workflow is the difference between clothes that browse and clothes that sell. The 10-step process in this guide — from RAW import through marketplace-specific export — is the same production spine Uniqs Studio uses to deliver colour-accurate, conversion-ready apparel images at scale. Whether you are building an in-house team or evaluating a studio partner, treat this as your operating checklist.
The next move is simple. Pick three current SKUs where you suspect editing is holding back sales, send them to [email protected], and let the Uniqs Studio retouching team return them fully edited within 24 hours. You will see the difference — and so will your customers.
Turn Your Apparel Catalogue into a Sales Engine
Get three free sample edits on your own SKUs. Uniqs Studio · Delhi NCR · 24-hour turnaround.