
Clothing Product Photography: 12 Image Mistakes That Make Apparel Listings Look Unprofessional
A category-specific diagnostic guide from Uniqs Studio Delhi NCR — the exact 12 image mistakes silently killing your Amazon, Myntra, Flipkart and Ajio conversions, plus the professional fix for each.
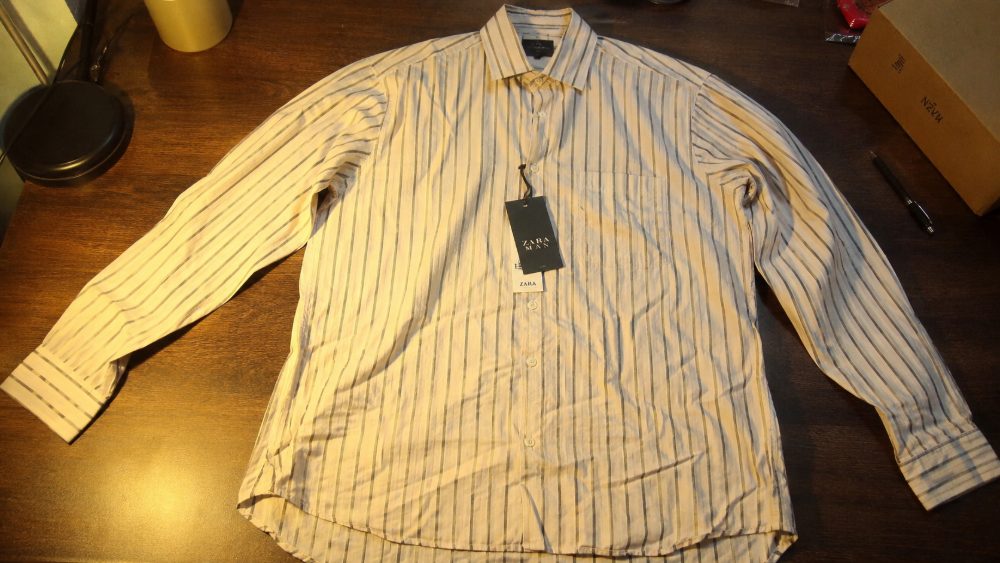
Wrinkles, yellow cast, weak framing.
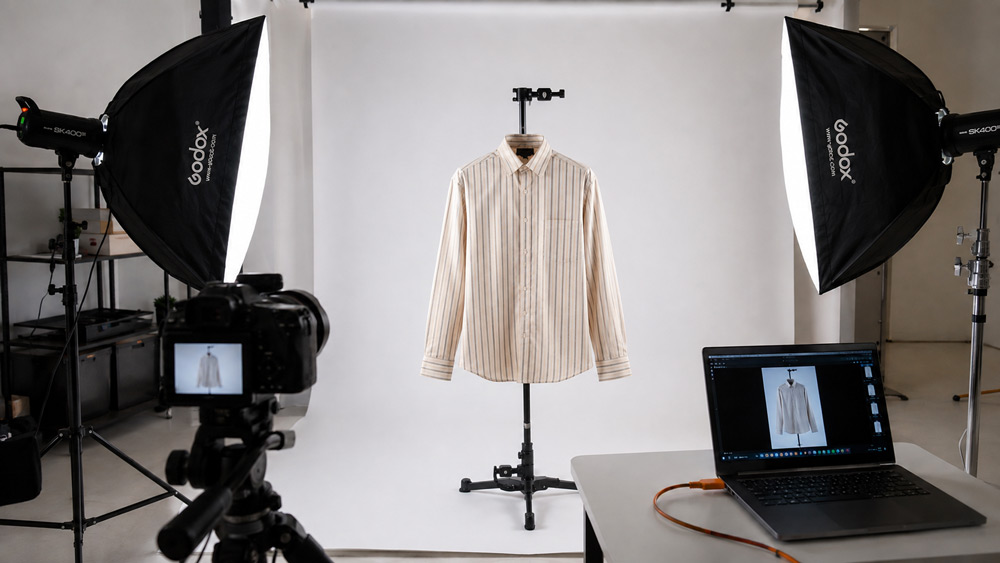
Steamed garment, neutral white, marketplace-ready.
Every scroll on Amazon India, Myntra, Flipkart or Ajio is a silent verdict. If your clothing product photography looks even slightly amateur, the buyer moves on before reading a single line of your copy. This diagnostic guide unpacks the exact 12 apparel image mistakes we see week after week at Uniqs Studio — and the professional fix for each.
- Wrinkles, wrong colours and weak framing account for the majority of apparel listing rejections and returns.
- Every serious marketplace expects a minimum 1000×1000 px image with the garment filling roughly 85% of the frame.
- Consistent lighting and framing across a catalogue matter more than a single hero shot.
- Most amateur mistakes are shoot-side problems that no amount of retouching can rescue.
- A professional apparel shoot in Delhi NCR starts at approximately Rs.150 per shot — a fraction of what one wave of returns costs.
Why Clothing Product Photography Quality Decides Your Sales
Modern buyers scan before they read. On a 6.7-inch phone, the first thing they meet is your product image, not your title or price. If that frame looks amateur, they scroll on within three seconds. At Uniqs Studio, we run diagnostic audits for D2C brands every week, and the pattern is brutally consistent — the listings that convert are almost always the ones with cleaner clothing product photography, not the ones with the lowest price. Weak apparel visuals silently cap your CTR, your add-to-cart rate, and eventually the ad efficiency of every rupee you push into Amazon or Meta.
This is why we treat the image itself as a silent salesperson. A single hero frame carries your fabric story, your finish, your fit intent — and the buyer’s trust in your brand. Good garment photography reduces returns because the buyer knows exactly what will arrive; poor visuals invite disappointment and one-star reviews. The gap between amateur and professional apparel shots often decides whether a marketplace algorithm promotes your listing or buries it. Read the deeper economics in our breakdown of how fashion photography lifts clothing sales.
The Direct Link Between Image Quality and Conversion Rate
Image quality does not just influence conversions — it anchors them. When we A/B tested reshoots for a Delhi NCR kurta brand last season, the same SKU with cleaner clothing product photography lifted add-to-cart by a meaningful margin without any change to price or copy. On mobile PDPs, buyers make judgements within milliseconds, and blurry threads or a yellow cast on white cotton reads as “cheap product” before the mind even names the problem.
This is exactly why serious sellers now spec their apparel shoots the same way they spec their fabric — with tolerances, checklists, and a defined visual style guide. If you’re planning a full brand catalogue, our fashion catalogue photography guide walks through how conversion-focused ecommerce studios structure the workflow, and the fashion photography for ecommerce service page explains the deliverables you should expect.
How Poor Clothing Product Photography Damages Brand Trust
A bad image says more than a bad review. Buyers instinctively assume that if the brand can’t afford good clothing product photography, it probably can’t afford good quality control either. This halo effect is silent but ruthless — it shrinks average order value, it kills repeat purchases, and it hands premium buyers straight to your competitor. Every serious apparel label we onboard at Uniqs Studio has felt this pain, usually at the exact moment marketing spend went up but conversion did not follow.
Rebuilding that trust is a slow game. Once a buyer files a return citing “product not as shown,” your listing carries that penalty for weeks. Clean, honest apparel images act as insurance against exactly this outcome, and reviewing our breakdown of clothing photography customers actually trust is a solid starting point before your next catalogue shoot.
The 12 Clothing Product Photography Mistakes Ruining Apparel Listings
These are the twelve mistakes we diagnose most often across marketplace audits in Delhi NCR — from ambitious D2C startups to established labels moving 500+ SKUs a month. Each one is a shoot-side problem with a specific, fixable cause. Work through them in order and your next catalogue will look measurably more professional than your last.
Visible Wrinkles and Creases on Garments
Wrinkles across the chest panel, folded sleeve creases from packaging, or bunched fabric at the waistline — the fastest amateur signal in any apparel frame.
Buyers read wrinkles as poor stitching or worn stock. Return citations spike, marketplace QC flags the SKU, and the listing loses ranking.
Steam every garment on-set, pin the shoulders on the ghost mannequin, and reserve retouching only for genuinely stubborn creases. Iron never substitutes steam for delicate fabrics.
In our decade of shooting apparel for Delhi NCR brands, wrinkles alone account for the biggest share of amateur QC failures. Cotton kurtas, linen shirts and rayon dresses hold every fold from the courier bag — and no marketplace algorithm forgives a wrinkled hero image. A disciplined clothing product photography workflow always starts with a garment steamer, a lint roller, and a wardrobe assistant who inspects each threads set before the camera fires. Denim and structured suiting need a different prep — a warm iron and a shoulder stretcher — because steam alone won’t lift a hard crease. If you’re battling wrinkle-heavy fabrics in-house, our ghost mannequin photography workflow shows exactly how professional studios keep every panel taut.
Post-production has real limits here. Cloning out fine creases is fair game; rebuilding an entire wrinkled sleeve in Photoshop is not, because the fabric behaviour under new light almost always looks fake. Buyers spot fake retouching immediately on mobile, and that is worse than the original wrinkle. For brands running high-volume kurta or ethnic wear catalogues, controlled steam prep is non-negotiable — see our bridal wear ghost mannequin workflow for how heavy fabrics are handled on set.
Inconsistent Framing Across Your Catalog
Some SKUs are shot at chest-crop, others at full-body, some centred, some drifting left — the catalogue looks stitched together from three different shoots.
Grid view looks messy on Amazon and Myntra, thumbnail CTR drops, and the brand loses its “considered” premium feel.
Lock camera height, focal length and product-fill ratio at the start of the shoot. Shoot tethered so QC catches drift immediately.
Consistent framing is the invisible discipline that separates a professional apparel catalogue from a hobbyist one. When every kurta, every shirt and every outfit sits at the same crop, the buyer scans your brand as one coherent story, not a random photo dump. Marketplaces like Myntra and Ajio explicitly favour consistent catalogues in their editorial curations, and Amazon India’s automated QC penalises catalogues where product-fill varies wildly between SKUs. If you’re comparing setups for consistency, our note on studio versus outdoor apparel shoots covers why controlled environments win for volume work.
Professional studios enforce framing consistency with three tools: a locked-off camera on a rigid tripod, a marked spot on the floor for the mannequin, and tethered capture so every frame is compared to the reference shot in real time. The moment framing drifts, the shoot pauses. This is why a shot list per SKU is standard practice at any serious apparel studio — it removes guesswork from the frame.
Inaccurate Colour Reproduction
The buyer orders “emerald green” and receives a duller olive. Reds shift orange, whites carry a yellow cast, navy blues look black.
Return rate spikes with the reason “colour not as shown” — one of the top three return codes on Indian apparel marketplaces.
Shoot with a colour checker card in the first frame of every SKU, calibrate the edit monitor monthly, and lock white balance manually to 5500K on strobes.
Colour accuracy is the single most damaging clothing product photography mistake for return economics. Every returned kurta or dress carries reverse-logistics, quality check, restocking and refurbishment costs — often more than the profit on the original sale. On mixed-light shoots, tungsten spills or LED colour drift push whites yellow and greens muddy before you notice. This is why every serious apparel studio uses a colour checker card in the reference frame — not as ceremony, but because it lets the retoucher lock true-to-life colour in one click.
If your monitor isn’t calibrated, even a perfect shoot dies in post. Buyers judging your outfits on their phone at 100% brightness see a very different rendering than an uncalibrated editor sees. Serious brands solve this with a hardware calibrator on every editing workstation and a signed-off colour reference from the client before batch delivery. For a real-world walkthrough of how professional studios manage colour discipline end-to-end, browse our complete garment photography for ecommerce guide.
Poor Detail Visibility on Fabric and Stitching
Weaves, embroidery, buttons and stitching lines vanish into a soft blur. The buyer can’t tell cotton from polyester.
Premium products look budget. Buyers refuse to pay premium prices for garments whose finish they can’t verify.
Shoot at aperture f/8–f/11 for edge-to-edge sharpness, add dedicated macro detail shots for embroidery and hardware, and preserve texture in compression settings.
Detail is where premium apparel earns its price. A cotton pintuck kurta, a hand-embroidered dupatta, or the topstitching on a fitted shirt — none of it survives if the shot is soft or over-compressed. Marketplace buyers scrutinise these details specifically because it’s how they judge authenticity, and any softness reads as “cheap fabric” no matter how good the actual garment is. This is where lens choice, aperture discipline and delivery format come together.
Standard practice at a professional studio is a sharpness-optimised primary lens, controlled aperture in the f/8–f/11 sweet spot, and dedicated macro close-ups for any hero details. Post-production preserves — never over-sharpens — texture, and delivery files are sized so that the buyer can zoom in without pixelation. For niche categories where detail is everything, our lingerie and innerwear photography workflow shows how micro-detail is protected end-to-end.
Inconsistent Lighting Across the Catalogue
Some SKUs look warm and cheerful, others cool and flat, others washed-out and pale — as if shot across three days and three studios.
Brand look feels amateur, and any A+ content or lifestyle collage built from these frames looks stitched together.
Lock strobe power, colour temperature and modifier position at the start of every session, and use a light meter to verify exposure across every SKU.
Lighting consistency is the second discipline — after framing — that non-professional shoots almost always fail. Any drift in colour temperature or exposure between the morning and evening halves of a shoot day shows up as a jarring mismatch in the final catalogue. Our own equipment stack at Uniqs Studio — four Godox SK 400II strobes, two Elinchrom FRX 400 heads, four strip softboxes, two octaboxes and a beauty dish — is chosen specifically for exposure repeatability across hundreds of SKUs. A light meter is used before every SKU batch to verify that key, fill and rim have not drifted.
Consistent lighting also protects colour discipline downstream. If white balance is locked at 5500K on every strobe, retouching becomes a one-batch operation instead of a per-frame fight. If you’re planning a large seasonal catalogue for a clothing brand, our fashion photography for clothing brands Delhi guide covers how lighting SOPs are documented before shoot day.
Weak or Wrong Cropping That Cuts Off the Product
Hems clipped, sleeves cut mid-cuff, or the top of the collar shaved off. Sometimes the crop varies between listing image and thumbnail.
Marketplace QC rejects the image, or the thumbnail loses impact on mobile grid views.
Shoot with adequate padding for every marketplace’s aspect ratio, use safe-zone guides, and crop from the widest master file — never re-crop from an already-cropped delivery.
Cropping mistakes are especially painful because they usually happen at the very end of the workflow, after everything else was done right. Amazon India requires a 1:1 square main image, Myntra prefers 3:4 portrait, Flipkart is flexible but rewards 1:1. If you shoot only one master and crop for every marketplace from it, you’ll cut sleeves, hems and collars somewhere. The fix is to shoot with a wide safe-zone from day one, and to keep the original uncropped master untouched.
Professional apparel photographers plan crops at the frame — not in Photoshop after. That means positioning the mannequin with room for a 3:4 crop, a 1:1 crop and a full-length 4:5 crop, all from the same master. This approach also protects thumbnail readability on 6-inch mobile screens, where a badly cropped hero image loses the click before the buyer even reaches the PDP.
Send us your catalogue link and we’ll flag every image failure in under 24 hours — free of charge. Call Satyam directly at +91-8076745824 or email [email protected].
Low-Resolution or Compressed Image Files
Zoom kills the image with pixelation, or the file was over-compressed to “save bandwidth” until edges turned mushy.
Amazon zoom fails to activate, buyer confidence drops, and any marketplace visual QC flags the SKU immediately.
Deliver at 2000×2000 pixels minimum, save as high-quality JPEG at 85–90 quality, and never re-export from a compressed source.
Low resolution is one of the most easily preventable image mistakes and one of the most common. Amazon India requires at least 1000 pixels on the longest side to activate zoom; Myntra and Ajio prefer 2000-pixel deliveries; Nykaa Fashion enforces its own minimums for its curated catalogue. Anything less looks acceptable on desktop preview and disastrous on a modern phone screen — and modern phones now handle the majority of PDP traffic in India.
Marketplace-Specific Resolution Requirements
The clean rule is to shoot and store master files at full sensor resolution, then deliver marketplace-optimised sizes from that master. Never re-export a marketplace file from an already-compressed marketplace file — every generation loses detail. For a modern full-frame body, a master file is easily 6000-plus pixels on the long edge, giving comfortable headroom for cropping and zoom.
Backgrounds That Distract From the Garment
Textured walls, off-white paper, visible cyclorama seams, or lifestyle props creeping into a listing frame.
Amazon India specifically rejects non-white main images, and the eye drifts from the garment to the background clutter.
Shoot on a pure white cyclorama for main images, save prop-heavy lifestyle frames for secondary slots, and clean backgrounds to a true 255 white in post.
Marketplace main images live under a strict rule — pure white background, product only, no props, no models beyond the mannequin, no shadows outside the natural drop. This is not a stylistic preference; it is a compliance requirement on Amazon India that gets your listing rejected if broken. Even off-brand “almost white” backgrounds carry a subtle grey tint on mobile displays, which reads as amateur.
Lifestyle imagery still matters, but it belongs in secondary slots and A+ content, not the main hero frame. Our workflow separates the two clearly — main slot on white cyclorama, secondary slots on branded lifestyle sets. If you’re comparing when white and when lifestyle wins, our ghost mannequin vs model vs flat lay breakdown is the go-to reference.
Insufficient Product Fill in the Frame
The garment sits small in the middle of a huge white void, wasting frame real estate on empty background.
Thumbnail looks tiny on the mobile grid, CTR drops, and Amazon may flag the SKU for the 85% product-fill rule.
Fill roughly 85% of the frame with the garment, keep only enough headroom to avoid marketplace edge-warnings, and re-shoot rather than re-crop when fill fails.
Amazon’s 85% product-fill rule is not just a guideline — it materially affects thumbnail impact. When your kurta or shirt takes up most of the frame, it reads instantly on a mobile grid and buyers click. When it floats small inside empty white, it reads as “low-effort listing” and buyers scroll on. Product-fill discipline is the difference between a listing that competes for the click and one that fades into the search results.
The fix is to plan the framing at the shoot, not in post. A dedicated ecommerce apparel photographer positions the ghost mannequin at a specific distance from the camera so the frame is already fill-optimised. This is one of the reasons professional studios always beat DIY setups on catalogue performance — every frame is engineered for the marketplace grid, not the desktop preview.
Missing Angle Coverage and Detail Shots
Listing has just front and back, no side view, no detail close-up, no inside/tag shot — buyer can’t inspect the garment fully.
Buyer hesitates and drops off the PDP, or worse — orders anyway and returns because expectations were unclear.
Follow the six-shot standard: front, back, both sides, macro detail, and inside/tag view. Every SKU, every time.
Angle coverage is where amateur and professional apparel catalogues visibly diverge. The six-shot standard — front, back, both sides, one detail close-up, and one inside or tag view — is the minimum a modern buyer expects before committing to a purchase. Skipping any of these leaves questions unanswered, and unanswered questions convert to abandoned carts and higher returns. The extra time on set is trivial compared to the drop-off cost of an incomplete gallery.
For seasonal drops or high-value SKUs, some categories benefit from a seventh shot — a fabric macro that shows weave and texture at true-to-life resolution. This is where professional macro lensing earns its cost, especially for premium ethnic wear where fabric quality is the entire pitch.
Distracting Shadows and Reflections
Hard drop shadows behind the garment, bright hot-spots on satin, or reflections in metal hardware pulling the eye.
Frame looks harsh, marketplace QC may reject strong drop shadows on main images, and the buyer’s eye lands anywhere except the product.
Use large, soft light sources, add fill and reflector cards, control ghost mannequin drop shadow with rim fill, and clean any residual shadow in post to a subtle natural drop.
Shadow control is often what visibly separates a Rs.150 amateur shot from a professional apparel frame. Hard, black drop shadows behind a garment scream “single-light setup,” while a controlled soft shadow reads as premium. The fix is not more lights — it is bigger, softer light sources, with reflector cards on the shadow side and a controlled rim to lift the outline off the background. Professional studios use strip softboxes on the sides and an octabox above precisely to achieve this look, frame after frame.
Reflective hardware — zippers, buttons, metallic threads — needs its own handling. A polarising filter, angled fill, or targeted flag prevents specular hotspots from stealing attention from the garment. Small choices like these compound across a catalogue into a visibly more polished brand feel.
Poor Post-Production and Retouching
Halo edges from bad background removal, over-smoothed fabric that looks plastic, or colour shift from aggressive retouching.
Buyer notices the fake finish, brand trust collapses, and marketplace curators pass over the SKU for featured placements.
Retouch conservatively, cut backgrounds cleanly with masking (not the magic wand), preserve texture, and QC every batch against the client’s approved style guide.
Post-production is where great shoots die if handled carelessly. Bad background removal leaves telltale halo edges around a kurta collar; over-aggressive skin retouching on model shots looks plastic; heavy noise reduction wipes out fabric texture. Buyers spot these artefacts on mobile immediately, and the halo effect on brand perception is worse than the original raw file would have been. Professional studios enforce a light, disciplined edit — colour correction, clean masking, subtle wrinkle removal, and nothing more unless the client’s style guide specifies it.
Batch consistency is the other half of good post-production. A catalogue of 200 SKUs must feel like one cohesive edit, not 200 individual passes. Signed style guides, batch presets, and a QC pass before delivery are how serious apparel studios keep every frame on-brand. For sellers considering in-house retouching versus outsourced, our post-production breakdown illustrates the same principles at a jewellery scale that translates directly to apparel.
Marketplace-Specific Image Standards for Clothing Product Photography

Every marketplace enforces its own image compliance rules, and shooting for one is not the same as shooting for all. A single well-planned shoot day can cover Amazon India, Myntra, Ajio, Flipkart, Meesho and Nykaa Fashion — but only if the aspect ratios, resolution and product-fill rules are respected from the start. Understanding these standards up front is the fastest way to eliminate marketplace rejections from your workflow.
Amazon India Clothing Image Requirements
Amazon India enforces the strictest visual QC among Indian marketplaces. Main images must sit on a pure white background (RGB 255,255,255), fill roughly 85% of the frame, and carry no props, watermarks, or additional text. Minimum resolution is 1000 pixels on the longest side to activate zoom, and preferred size is 2000-plus pixels. Detailed requirements sit on the Amazon Seller Central India image requirements page, which every apparel seller should bookmark. Getting any of these wrong triggers a listing suppression, sometimes without email notification.
Myntra & Ajio Apparel Image Standards
Myntra and Ajio both prefer 3:4 portrait framing, minimum 2000 pixels, and lean strongly on ghost mannequin or model imagery over flat lay for main slots. Both platforms manually curate their catalogues, so consistency and colour accuracy matter as much as compliance. Myntra’s studio partner network expects a specific styling standard — steamed garments, matching accessories, and neutral backdrops — that mirrors what our team delivers by default. Our flat lay photographer for clothing brand overview covers how the same discipline extends to editorial flat lays for Myntra Studio placements.
Flipkart, Meesho & Nykaa Fashion Image Guidelines
Flipkart is more flexible on aspect ratio but rewards 1:1 square main images for grid consistency. Meesho enforces a minimum 800-pixel size but converts everything internally, so uploading at 2000 pixels always wins. Nykaa Fashion curates aggressively and expects editorial-grade lifestyle context in secondary slots alongside clean white-background mains. Guidelines are updated periodically on the Flipkart Seller Hub — worth checking before every new season’s catalogue upload.
The Real Cost of Bad Clothing Product Photography for Ecommerce Sellers
The visible cost of bad apparel photography is the reshoot bill. The invisible cost is everything else — lost impressions, lower ad relevance scores, higher CPC, higher return rates, restocking costs, warehouse penalties for damaged returns, and the opportunity cost of every listing that got suppressed for QC failure. Add these up across even a modest 100-SKU catalogue and the numbers dwarf the cost of doing the shoot professionally the first time.
Lost Sales, Higher Returns, Rejected Listings
Return handling on Indian apparel marketplaces routinely costs Rs.150–300 per unit in reverse logistics, refurbishment, and restocking. A single wave of “colour not as shown” returns on 50 SKUs can easily wipe out a month’s profit margin. Rejected listings, meanwhile, sit in suppression queues while competitors capture the search demand. This is the true price of amateur clothing product photography — and it renews every season.
Clothing Product Photography Pricing in Delhi NCR
Professional apparel photography in Delhi NCR is more accessible than most sellers assume. At Uniqs Studio, catalogue rates start at approximately Rs.150 per shot for volume ghost mannequin work and rise to Rs.800-plus per shot for editorial model-based shoots with full retouching. Pricing depends on photography type, angle count, retouching depth, and volume commitment. For a transparent breakdown, browse our fashion photography cost in Delhi guide and ghost mannequin photography price for 2026.
| Package | SKUs | Type | Angles | Turnaround | Price (INR) |
|---|---|---|---|---|---|
| Starter | Up to 20 | Flat lay OR ghost mannequin | 3 | 72 hrs | from Rs.150/shot |
| Growth | Up to 50 | Ghost mannequin + flat lay | 5 | 48 hrs | from Rs.250/shot |
| Brand | Up to 150 | Ghost mannequin + flat lay + detail | 8+ | 72 hrs | from Rs.450/shot |
| Enterprise | 500+/month | All types + model combos | Custom | Custom SLA | Custom quote |
Professional Clothing Product Photography Checklist
Every professional apparel shoot follows a repeatable checklist. This is the one Uniqs Studio uses on Delhi NCR shoot days across kurtas, shirts, dresses, denim and ethnic wear. Print it, laminate it, tape it above your steamer — it will save you a reshoot within the first month.
- Steam every garment thoroughly on-set.
- Lint-roll fabrics for hair and dust.
- Inspect stitching, buttons and tags.
- Confirm mannequin fit for each SKU.
- Prepare shot list per SKU.
- Lock tripod, camera height, focal length.
- Fix white balance at 5500K on all strobes.
- Include colour checker in first frame.
- Verify exposure with light meter each SKU.
- Shoot tethered for real-time QC.
- Batch-correct white balance from colour checker.
- Clean background to pure 255 white.
- Deliver 2000-plus px master file per SKU.
- Resize for each marketplace’s aspect ratio.
- Final QC every frame against style guide.
Tools & Equipment We Use at Uniqs Studio
Our production stack for high-volume clothing product photography is built specifically for repeatability across hundreds of SKUs per week. Bodies are the Canon R10 and Sony A7R5 for full-frame resolution and colour depth; lens work leans on a 50mm prime for general apparel and a 100mm macro for embroidery and hardware detail. Lighting relies on four Godox SK 400II strobes, two Elinchrom FRX 400 heads, four strip softboxes and two octaboxes for even wrap, plus a beauty dish reserved for fashion and model days. Every element is calibrated for exposure consistency across a full shoot day.
For ecommerce sellers doing in-house work, our recommendation is simpler: one full-frame body, one 50mm prime, two continuous LED softboxes with 5500K panels, a solid tripod, a colour checker card, and a calibrated monitor. This entry stack won’t match a professional studio’s output, but it will keep you clear of the twelve mistakes listed above for most standard categories.
Amateur vs Professional — Side-by-Side
| Quality Factor | Amateur Result | Professional Result | Business Impact |
|---|---|---|---|
| Wrinkles | Visible across the panel | Steamed, flat, on-set retouched | Lower return rate |
| Colour Accuracy | Yellow cast, muddy greens | Colour checker verified | Fewer “not as shown” returns |
| Lighting | Drifts across the shoot day | Locked, meter-verified per SKU | Consistent catalogue feel |
| Resolution | Under 1000 px, over-compressed | 2000-plus px master, quality JPEG | Zoom works, QC passes |
| Framing | Drifts every SKU | Locked, tethered, style-guided | Premium brand feel |
| Post-Production | Halo edges, plastic finish | Clean masks, natural texture | Higher buyer trust |
Frequently Asked Questions About Clothing Product Photography Mistakes
These are the questions we hear most from D2C brands and marketplace sellers auditing their apparel catalogues at Uniqs Studio.
Visible wrinkles and creases top the list, followed by inaccurate colour reproduction. Both instantly signal amateur work and drive higher return rates on marketplaces like Amazon India, Myntra, and Ajio.
Most Indian marketplaces require a minimum of 1000×1000 pixels, with 2000×2000 pixels recommended for zoom functionality. Amazon India specifically requires at least 1000 pixels on the longest side for zoom to activate.
Inaccurate colours result from wrong white balance, uncalibrated monitors, incorrect ICC profiles, or lighting temperature drift. Professional studios use colour calibration cards and calibrated monitors to guarantee true-to-life reproduction.
Professional clothing product photography in Delhi NCR typically ranges from Rs.150 to Rs.800 per shot depending on complexity, volume, retouching depth, and photography type (flat lay, ghost mannequin, or model).
Minor issues like slight colour correction, background cleanup, and small wrinkle removal can be fixed in post-production. However, structural mistakes like wrong framing, poor lighting, and low resolution almost always require a reshoot.
Final Verdict: Fix These Clothing Product Photography Mistakes Before Your Next Shoot
Every one of these twelve mistakes is fixable, and every one of them silently caps your apparel sales until it is. The buyer scrolling on a phone at 11pm doesn’t know the difference between a Rs.150 amateur shot and a Rs.150 professional one — they only know which listing looked worth the click. Serious brands treat their clothing product photography as revenue infrastructure, not marketing overhead, and the ROI shows up in every metric that matters.
If you’d rather have professionals shoot your next catalogue, Uniqs Studio serves D2C brands and marketplace sellers across Delhi, Noida, Gurgaon, Faridabad and Ghaziabad from our Delhi NCR studio. Call Satyam at +91-8076745824, WhatsApp us at +91-8076745824, or drop a mail to [email protected] for a same-day quote.
Delhi NCR’s trusted clothing product photography studio for D2C brands and marketplace sellers on Amazon, Myntra, Flipkart and Ajio. 9+ years, 500+ brands, zero drama.