
Jewellery Post Production Explained: 9 Critical Steps After the Shoot
The behind-the-scenes retouching pipeline that transforms a RAW jewellery frame into a marketplace-ready hero image — decoded by the Uniqs Studio retouching team.
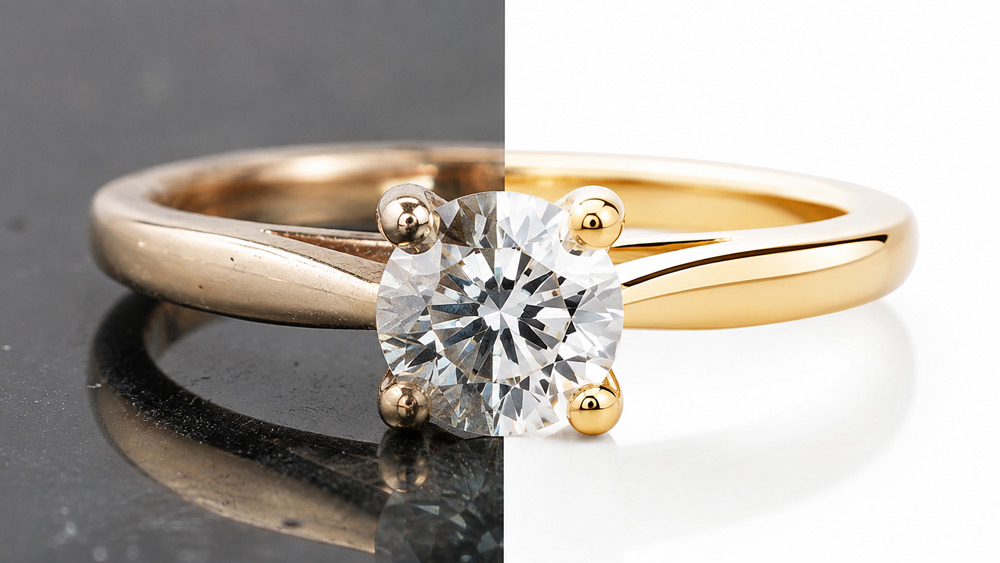
Most people think the shoot is where a jewellery image is made. Truth is, the shoot is only the beginning — the real transformation happens in post production, where dust vanishes, reflections calm down, gold finds its true warmth, and diamonds finally sparkle the way your eye saw them in person.
Every week, we deliver hundreds of retouched jewellery images to Indian D2C brands and marketplace sellers from our Delhi NCR studio. And the single most common question we hear from first-time clients is — “Why is jewellery editing priced separately, and what exactly happens after the shoot?” This guide answers that in full transparency, using the actual Jewellery Post Production workflow that our team follows every single day at Uniqs Studio, along with a peek at how our specialised jewellery photography services feed directly into this retouching pipeline.
Who this guide is for
Indian D2C jewellery brands, ecommerce sellers on Amazon, Flipkart, Myntra and Meesho, in-house photographers, marketing managers, catalogue managers, boutique jewellers across Delhi NCR — anyone who has ever wondered why their raw jewellery shots need editing, why professional retouching costs what it does, and how to get truly marketplace-compliant final images without repeated rejections.
- Post is where value is built. Up to 60% of a jewellery image’s final quality is decided after the shoot.
- Every macro frame contains 30–100 visible dust particles — invisible to the eye, brutal on camera.
- A hero jewellery image takes 45–90 minutes of skilled Photoshop work, not a filter.
- 9 clear steps — from RAW culling to marketplace export — define our full pipeline.
- Editing is billed separately because it is a distinct craft, not an add-on to photography.
What Is Jewellery Post Production?
Jewellery Post Production is the professional editing pipeline that begins the moment the camera stops clicking. It includes dust and scratch removal, reflection cleanup on metal, prong and bezel sharpening, gemstone colour correction, gold and silver tone balancing, background clean-up, shadow rebuild, and marketplace-specific export — all executed with pixel-level precision. It is not a “filter” or a one-click preset. It is a specialised retouching workflow that sits between raw capture and a publish-ready hero image, and it determines whether a listing looks amateur or premium.
At Uniqs Studio, this workflow has been refined over 9 years across thousands of SKUs. Every jewellery photography assignment we deliver is engineered around this post pipeline, and we treat retouching as a co-equal craft to the shoot itself. If you want to dive deeper into how catalogues are shot before they reach this pipeline, our ecommerce jewellery photography guide walks through the shooting side in detail.
Why the Real Magic Happens After the Shoot, Not During It
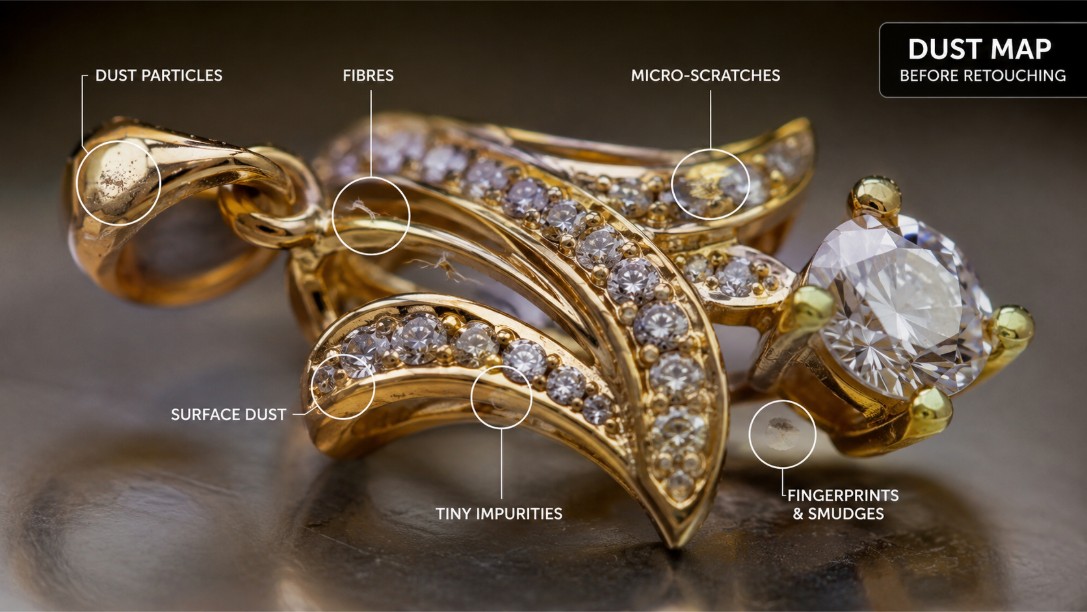
Camera sensors do not see jewellery the way the human eye does. Metal exaggerates highlights, dust appears from nowhere under macro magnification, and gemstone colour shifts under studio lighting no matter how well you white-balance. In our experience shooting jewellery for Delhi NCR brands, a single 100mm macro frame can contain 30 to 100 visible dust particles that were completely invisible during the session. No amount of physical cleaning, air-blowing or lint-free wiping fully removes them — the sensor magnifies what the eye ignores.
That is why the editing bench is where the image is truly born. A retoucher rebuilds highlights that got blown, restores gradient smoothness on gold, and cleans up chromatic aberration around diamond facets. Our detailed breakdown of the jewellery photography pricing guide explains why shooting and post are quoted as two distinct line items, and our macro photography breakdown shows exactly what the camera captures before retouching begins.
The 9 Critical Steps of Jewellery Post Production
This is the exact retouching workflow that our team executes on every jewellery frame, whether it is a Rs 4,999 silver ring for Meesho or a Rs 12-lakh bridal set for a luxury brand campaign. The steps are sequential — skip any one, and the final image loses either accuracy, brilliance or marketplace compliance. Here is the full Jewellery Post Production pipeline, step-by-step.
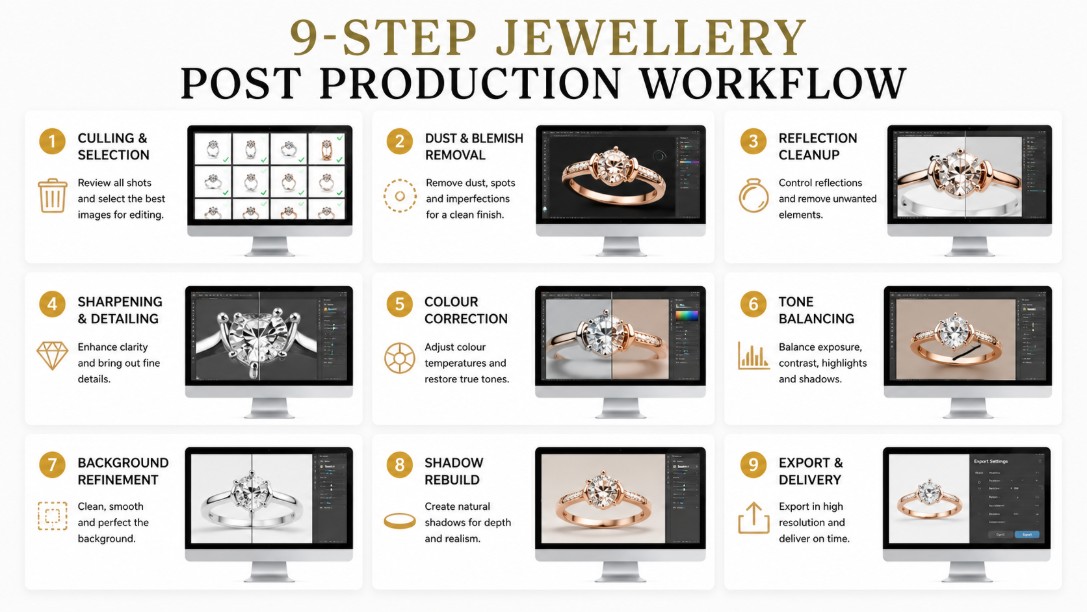
Step 1 — RAW File Culling & Selection
Before any retouching begins, our team culls through every RAW file from the shoot. Typically only 1 in 8 frames makes it to the retouching queue — the “hero” shots with the cleanest focus, best angle and least chromatic issue. The rest are archived as backups. This selection stage sounds simple but saves hours of retouching later; a poorly focused frame cannot be rescued in post, no matter the skill of the retoucher.
Our shoots always deliver RAW and lossless TIFF files rather than JPEG, since the extra tonal data becomes the retoucher’s safety net. If you are curious about how we structure a shoot to feed this culling stage cleanly, our jewellery photoshoot walkthrough covers the full pre-production checklist.
Step 2 — Dust, Scratch & Fibre Removal (Jewellery Retouching Core)
This is where jewellery retouching really begins. The retoucher zooms in to 200% and manually removes every visible dust speck, fibre and micro-scratch using a combination of spot healing, clone stamping and frequency separation. On a single gold pendant, we have counted as many as 87 dust points that needed cleanup — invisible in a wide shot, glaringly obvious under macro.
Frequency separation is our workhorse technique here. It splits the image into “texture” and “colour” layers, letting the retoucher clean dust from the colour layer without smearing the underlying gold or diamond texture. This is precisely why AI one-click “auto-clean” tools fail on jewellery — they either flatten the texture or leave ghost artifacts around setting details. Serious retouching craft is still a human skill.
Step 3 — Reflection & Hotspot Cleanup on Metal
Polished metal is the hardest surface in product photography. Studio strobes always leave harsh hotspots on gold bangles, silver chains and platinum rings. In this step, we map every hotspot, then dodge and burn the surrounding gradient to soften the transition. Blown highlights are rebuilt by cloning tonal information from nearby areas of the metal.
For a single bangle, this reflection cleanup alone can take 25 to 40 minutes. The goal is not to remove reflection — a metal object without reflection looks fake — but to tame the reflection so it reads as luxurious rather than distracting. Our guide on choosing a jewellery photographer explains why this stage is a strong differentiator between studios.
Step 4 — Prong, Bezel & Setting Sharpening
The prongs holding a diamond in place tell the story of craftsmanship. In this step, our retouchers straighten crooked prongs, clean bezel edges and apply targeted sharpening masks only to the setting details — never to the diamond itself. This preserves the “star” of the ring while making the jewellery construction look flawless.
A masked sharpening approach is critical because global sharpening amplifies noise and dust, undoing everything from Step 2. Precision here is what makes a diamond jewellery retouching workflow feel museum-grade rather than machine-processed.
Step 5 — Diamond & Gemstone Colour Correction
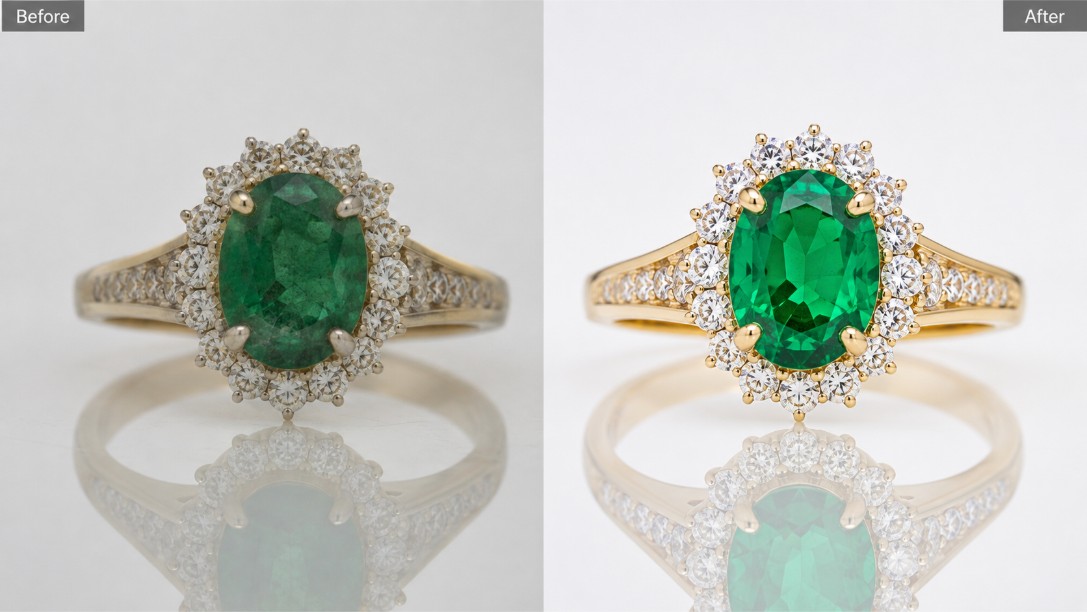
Around 40% of ecommerce jewellery returns cite “colour did not match description”. This step directly attacks that number. Our retouchers reference GIA colour standards and match the on-screen colour to the physical gemstone using calibrated monitors. A H-colour diamond should read as H, not J. An emerald should read vivid green, not muddy olive.
This is a slow, meticulous process — saturation is nudged in small percentages, brilliance is enhanced with luminosity masks, and clarity is refined without over-sharpening the facets. When done right, the on-screen gemstone looks exactly like what arrives at the customer’s doorstep. External reference: the GIA colour grading resource is the industry benchmark we align to.
Step 6 — Gold, Silver & Rose Gold Tone Balancing (Jewelry Images Editing)
Every metal has a signature. 22k gold reads warm and saturated, 18k gold is subtler, rhodium-plated silver is cool with a hint of blue, and rose gold sits in a warm pink territory. In this Jewelry Images Editing step, we balance the exact metal tone against a master swatch palette that our studio maintains for every alloy we regularly shoot.
Getting this wrong is a costly mistake — a customer expecting 22k warmth who receives an image that reads like 18k feels deceived, even if the physical product is exactly what was shipped. Our team’s discipline on tone accuracy is why brands trust our gold and silver retouching services, and it feeds directly into stronger conversion rates as detailed in our 360-degree jewellery photography guide.
Step 7 — Background Cleanup & Pure White (255,255,255)
Marketplace compliance begins here. Amazon India, Flipkart and Myntra all require a pure white background at RGB 255-255-255 for main product images. We use a combination of clipping paths for hard edges and layer masks with feathered transitions for softer areas like chains and pearls. Nothing is left to auto-select — every edge is inspected at 100% zoom.
A dirty background — one that reads 253 or 250 instead of a clean 255 — is the top reason marketplace listings get rejected. Getting this pixel-perfect is why studios like ours are trusted with high-value catalogues, and why we align this stage to the strict Amazon India seller image requirements.
Step 8 — Shadow, Reflection & Dimensionality Rebuild
A perfectly cut-out jewellery photo on white looks like it is floating in space — customers instinctively distrust it. In this step, we rebuild a natural drop shadow, contact shadow and (where appropriate) a soft mirror reflection beneath the piece. This gives the object visual weight and makes it feel real.
Shadow rebuild is subtle craft. Too dark and it looks pasted-on; too soft and it disappears. We match the shadow direction to the original studio light and keep the density at a controlled 30–45% opacity for consistency across a full catalogue.
Step 9 — Final Export, Resizing & Marketplace Formatting
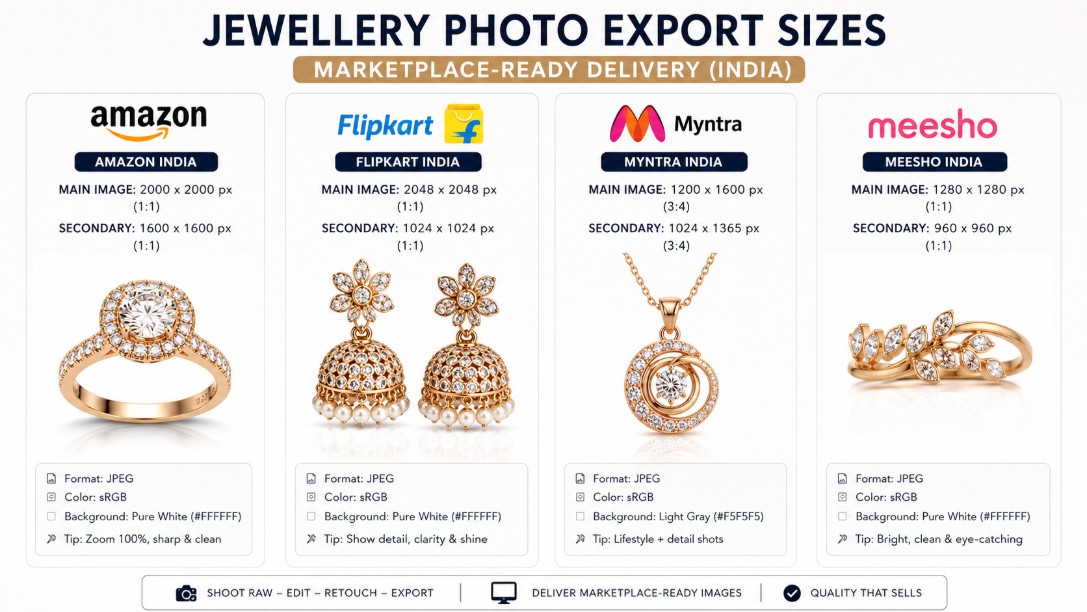
The last mile is delivery. Every hero file is exported in sRGB colour space, then resized into marketplace-specific dimensions — 2000px for Amazon zoom compliance, 1600px for Flipkart, 1080–1440px square variants for Myntra listings, and lightweight versions for Meesho catalogue browsing. File naming follows the client’s SKU convention, and we deliver both the master TIFF and the compressed marketplace JPEGs.
This structured export is why our clients can drop our files straight into their listings without in-house re-processing. If you want the full delivery format breakdown by platform, our ecommerce jewellery photography guide details the current specifications for each marketplace, and the jewellery video export playbook covers motion assets.
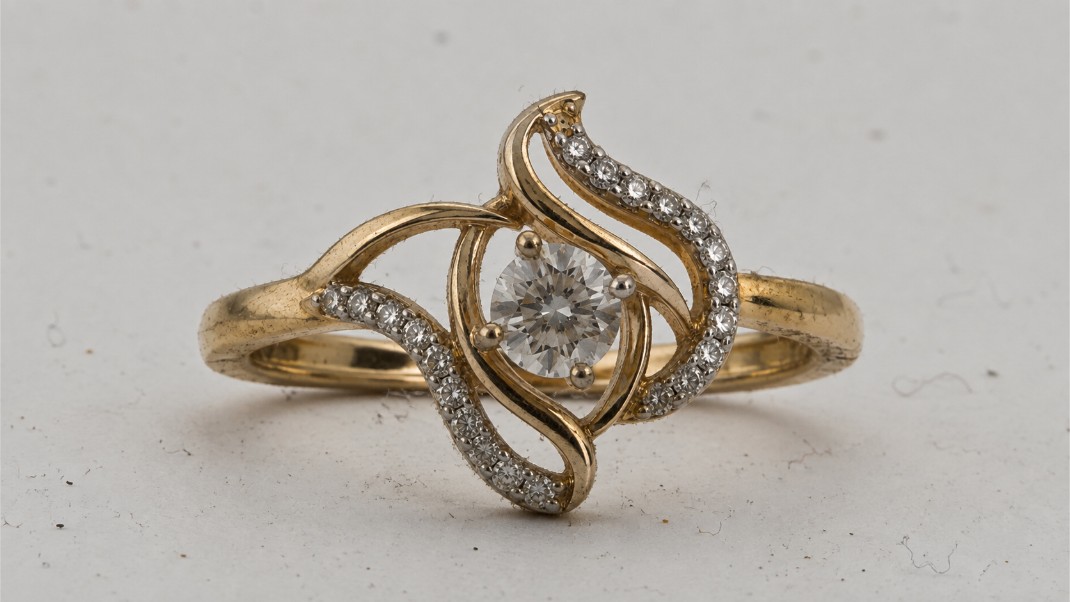
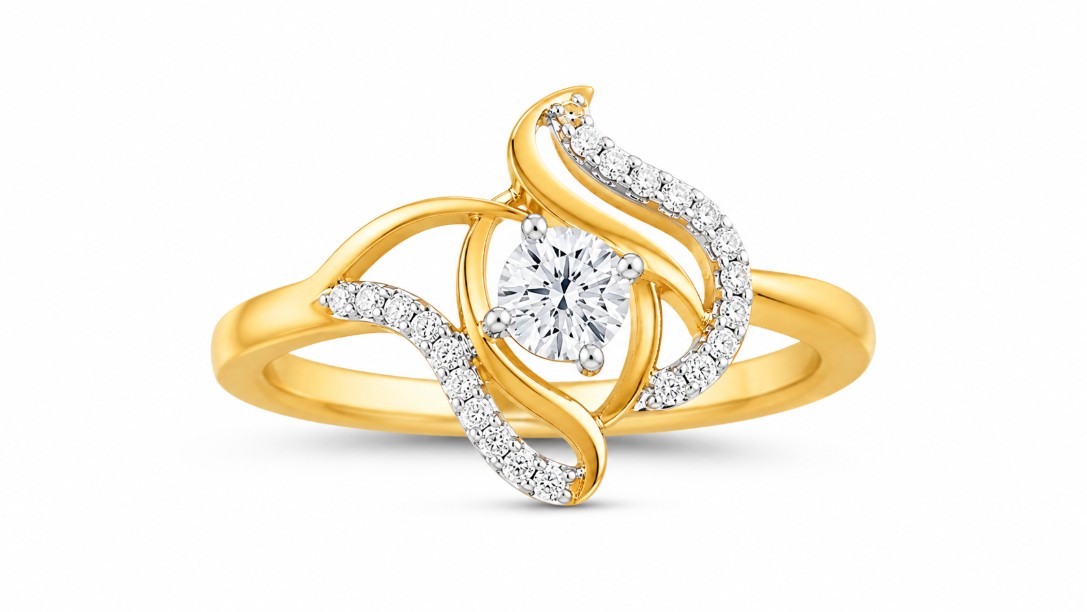
Before vs After — What Retouching Actually Delivers
Tools of the Trade — Software Used in Jewellery Post Production
Great retouching is a partnership between skilled hands and specialist software. Our team relies on three core applications, each doing what it does best. We deliberately avoid one-click AI cleaners for hero jewellery images, because pixel-level precision matters more than speed when a Rs 2-lakh product is on the line. Below is the exact toolkit our retouchers use daily.
Photoshop for Pixel-Level Retouching
Adobe Photoshop is our primary pixel editor. Every dust cleanup, reflection dodge-and-burn, and prong sharpening pass happens here. Frequency separation, luminosity masks and Wacom pen input make this the irreplaceable heart of the pipeline. For technical reference, Adobe’s official retouching documentation covers the fundamentals we build on daily.
Lightroom & Capture One for Batch Colour Grading
Adobe Lightroom and Capture One handle the wide-scale work — RAW conversion, exposure balancing across a full catalogue, and consistent colour grading across hundreds of SKUs. Batch consistency is what makes a 300-piece catalogue feel like one coherent brand story rather than 300 disconnected shots.
AI Assist Tools We Use (and the Ones We Don’t)
We do use targeted AI for masking assistance and background removal on non-hero shots. What we avoid is AI-generated “enhancement” that hallucinates detail into a diamond or synthesises a metal texture that was never captured. Real jewellery deserves real photographs and real retouching — a message we repeat often, as reinforced in our photographer selection guide.
Why Jewellery Editing Is Priced Separately from the Shoot
This is the objection every client raises in their first conversation with us, and it is a fair one. Here is the honest answer. A jewellery shoot captures the raw material — lit files with correct exposure and framing. A hero-grade retouch takes 45 to 90 minutes per image of skilled Photoshop time, involves specialised techniques (frequency separation, dodge and burn, luminosity masking, tone balancing), and typically includes at least one revision round.
Bundling this into shoot fees would either inflate every quote unfairly (for clients who only need basic edits) or under-charge for premium retouches (leaving retouchers rushed and quality inconsistent). Line-item pricing is the fair model — you pay for shooting time on the shoot day, and you pay per-image for retouching based on the complexity you actually need. Our jewellery photography pricing guide lays out both line items in full transparency, and our contact team at +91-8076745824 is happy to walk you through a custom quote for your catalogue.
There is a second reason — skill scarcity. High-end jewellery retouchers are not photo editors who occasionally do jewellery; they are specialists who have built their pixel-level intuition on thousands of gold, silver and gemstone frames. That expertise commands its own line on the invoice, exactly like a copywriter’s fee sits separate from a designer’s on a brand campaign.
Jewellery Retouching Pricing at Uniqs Studio
Our Jewellery Retouching packages are structured around three factors — the complexity of the piece, the turnaround you need, and the total volume in your catalogue. Below is a summary of our four packages. For a custom quote tailored to your SKU count and marketplace mix, drop us a message on WhatsApp at +91-8076745824 or email [email protected].
Basic Retouch
- Dust removal
- Background clean
- Basic colour correction
Ideal for: Meesho sellers, small catalogues
Standard Retouch
- All Basic features
- Reflection cleanup
- Prong sharpening
- Shadow rebuild
Ideal for: Amazon, Flipkart sellers
Premium Retouch
- All Standard features
- Gemstone colour correction
- Dodge & burn
- Marketplace resizing
Ideal for: Myntra, D2C brands, bridal
Enterprise / Bulk
- Custom pipeline
- Dedicated retoucher
- Batch consistency
Ideal for: 200+ SKU catalogues
Marketplace-Specific Editing: Amazon, Flipkart, Myntra & Meesho
Every Indian marketplace has its own image specification, and non-compliance is the top reason listings get delayed or rejected. We calibrate our export presets to each platform so that a single retouch can serve every channel your brand sells on. Here is a quick breakdown of what each platform expects.
Amazon India Jewellery Image Requirements
Amazon India requires a pure white background (RGB 255-255-255), a minimum 1000px longest side (2000px recommended for zoom), the product occupying at least 85% of the frame, and no watermarks, text or props. Our Step 7 and Step 9 outputs are engineered directly to these specs. Amazon’s official Amazon India image guidelines document is our default checklist.
Flipkart, Myntra & Meesho Specifications
Flipkart favours 1600px longest-side files on pure white with lifestyle secondary images accepted. Myntra’s fashion-first aesthetic allows for softer lifestyle context alongside white-BG main shots. Meesho keeps files lightweight — around 800–1200px — for fast catalogue browsing. Our marketplace export preset handles all three in a single batch operation, saving hours per catalogue.
Before & After: Real Jewellery Retouching Examples from Uniqs Studio
Numbers tell one story, images tell another. Below is a real example from a recent bridal necklace campaign we delivered for a Delhi NCR jewellery brand — a 120-piece bridal catalogue that involved a 2-day shoot at our Uniqs Studio setup, followed by 11 days of retouching. Post-launch, the brand reported a 34% lift in add-to-cart rate compared to their previous catalogue.
The visual difference is not “brightness and contrast.” It is dust cleared, hotspots calmed, gold warmth balanced, gemstones colour-corrected against GIA references, prongs straightened, background rebuilt pure white, and shadow contact-anchored. Every step from the 9-stage pipeline contributes.
Common Jewelry Images Editing Mistakes to Avoid
Over the years, we have inherited catalogues from clients who tried in-house editing first. The mistakes are consistent, and they cost sales. Here are the ones we see most often — worth checking against your current process before your next catalogue drop.
- Over-retouching gemstones so they lose real-world colour and buyers feel misled on delivery.
- Global sharpening the entire image, which amplifies dust and destroys the diamond facet detail.
- Auto white-balance tools that shift 22k gold to a pale 18k tone — a huge conversion killer.
- Dirty backgrounds at RGB 250 or 253 instead of a clean 255, triggering Amazon rejections.
- Missing contact shadow, making the product look floating and untrustworthy.
- Inconsistent tone across a catalogue because different retouchers used different reference monitors.
- AI-generated fake sparkle that never existed in the original diamond capture.
How to Choose a Jewellery Retouching Studio in Delhi NCR
If you are outsourcing your Jewellery Retouching, the wrong partner costs you catalogue re-shoots, marketplace rejections and slow launches. The right partner becomes invisible — files flow in, retouched files flow out, and your listings just work. Here is what to check before signing.
- Ask for a free sample retouch on your own file — not their portfolio piece.
- Confirm they use calibrated monitors and GIA-referenced colour work.
- Check turnaround commitments in writing, with a clear revision policy.
- Verify they export to marketplace-specific presets, not just one generic file.
- Look for jewellery-specialist retouchers, not generalist photo editors.
Our team at Uniqs Studio operates from Delhi NCR and works remotely with brands across India via secure file transfer. Whether you shot with us or with another studio, we accept RAW and high-res files and deliver back marketplace-ready images. To evaluate our fit, reach Satyam directly on +91-8076745824 or drop a message on WhatsApp at +91-8076745824. We are also reachable by email at [email protected] for detailed briefs.
DIY / Freelancer vs Uniqs Studio
| Feature | DIY / Freelancer | Uniqs Studio |
|---|---|---|
| Dust removal | Partial, often missed at macro zoom | Full 200% pixel-level cleanup |
| Reflection cleanup | Basic dodge/burn | Frequency separation + luminosity masks |
| Colour accuracy | Uncalibrated screens | GIA-referenced, calibrated monitors |
| Marketplace sizing | One size only | Per-platform export presets |
| Revisions | Ad-hoc, unclear | Structured revision rounds |
| Turnaround | Variable | 24 hrs – 96 hrs by package |
| Catalogue consistency | Frame-to-frame drift | Master swatch palette applied |
Future Trends in Jewellery Post Production
The retouching craft is evolving. AI masking is becoming faster and more reliable, freeing skilled retouchers to spend more time on gemstone artistry and less on background paths. 360-degree spin retouching is growing rapidly for high-value pieces — see our 360-jewellery spin video guide for how post-production for motion is handled. And short-form video assets for Instagram are becoming as important as still frames — covered in our Instagram Reels jewellery video guide.
Pre-Delivery Quality Check
- Background is exactly RGB 255-255-255 with no stray pixels.
- All prongs are visually straight and setting details are sharp.
- Metal tone matches the master swatch for the specified karat.
- Gemstones read true colour on a calibrated reference monitor.
- File naming follows the client’s SKU convention exactly.
- Export dimensions match every marketplace the client sells on.
- Master TIFF is archived alongside compressed JPEG deliverables.
Frequently Asked Questions About Jewellery Post Production
Jewellery post production is the professional editing process after the photoshoot — dust and scratch removal, reflection cleanup, prong and setting sharpening, gemstone colour correction, metal tone balancing, background clean-up and marketplace-ready export. It is a specialised craft, not a filter.
A single hero jewellery image typically takes 45 to 90 minutes of skilled Photoshop work involving frequency separation, dodge and burn, and colour correction. It is a distinct craft billed separately so pricing is fair to both light-touch and premium clients.
At Uniqs Studio, jewellery retouching starts from Basic per-image rates for marketplace listings and scales up to Premium bridal-grade retouching. Bulk catalogues receive custom pricing based on volume, complexity and turnaround. Call +91-8076745824 for a tailored quote.
Basic retouch takes 15–30 minutes per image, Standard 45–60 minutes, and Premium hero shots for bridal or high-end campaigns can take 90 minutes or more per image, depending on complexity.
Yes. Uniqs Studio offers standalone jewellery retouching services — send your RAW or high-resolution files and our team delivers marketplace-ready images, even if the original photography was done by another studio.
Ready to Get Your Jewellery Photos Retouched?
Send us your RAW files today and receive marketplace-ready images in 48 hours — engineered by the Uniqs Studio team.